
Create Cloud Connect
Overview
Use F5 Distributed Cloud Console to create a Cloud Connect.
About Cloud Connect
Cloud Connect is a cloud-neutral approach that allows you to attach your private cloud network to F5 Distributed Cloud Customer Edge (CE) sites.
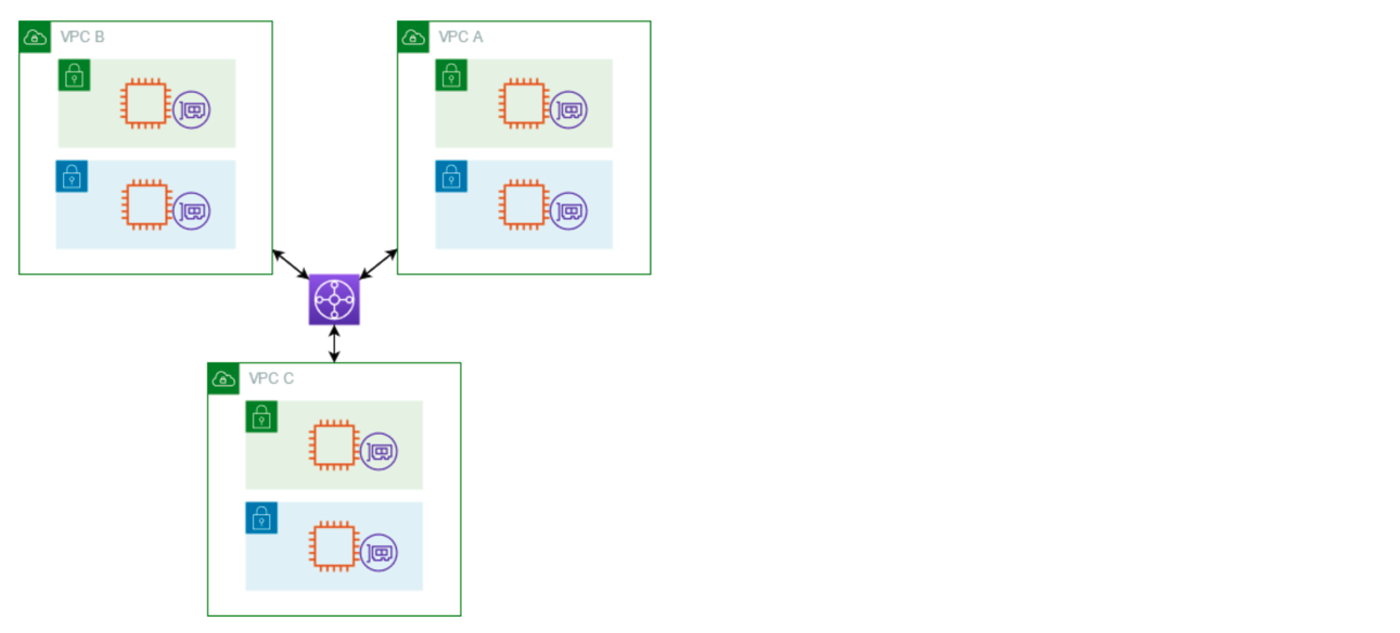
Figure: AWS Cloud Connect example diagram
Limitations for AWS configurations
Note the following limitations when attaching a Cloud Connect with AWS as a provider:
-
When you attach a VPC to a TGW, any resources in Availability Zones where there is no TGW attachment can't reach the TGW. If there's a route to the TGW in a subnet route table, traffic is forwarded to the TGW only when the TGW has an attachment in a subnet in the same Availability Zone.
-
The resources in a VPC attached to a TGW can't access the security groups of a different VPC that is also attached to the same TGW.
-
A TGW doesn't support routing between VPCs with identical CIDRs. If you attach a VPC to a TGW and its CIDR is identical to the CIDR of another VPC that is already attached to the TGW, the routes for the newly attached VPC aren't propagated to the TGW route table.
-
You can't create an attachment for a VPC subnet that resides in a Local Zone.
-
You can't create a TGW attachment using IPv6-only subnets.
-
The TGW attachment subnets must also support IPv4 addresses.
-
A TGW must have at least one VPC attachment before that TGW can be added to a route table.
-
The maximum number of supported VPCs is 128 for each Cloud Connect.
-
The VPC is discovered from the site region using the selected credential.
-
The VPC must have at least one subnet.
-
In Distributed Cloud Console, you can't edit a selected credential or AWS TGW site.
Before you begin
Before you begin, you must have:
-
An F5 Distributed Cloud account. If you don't have an account, see Get Started with Distributed Cloud Console.
-
For AWS:
- An existing AWS TGW site with Hub, Spoke, and Services route tables.
- An AWS TGW CE site must be in the online and available states.
- Cloud credentials with the required AWS permissions:
| AWS Elastic Compute Cloud (EC2) permissions | AWS Resource Access Manager (RAM) permissions |
|---|---|
| ec2:CreateTransitGatewayVpcAttachment | ram:GetResourceShareInvitations |
| ec2:DeleteTransitGatewayVpcAttachment | ram:AcceptResourceShareInvitation |
| ec2:ModifyTransitGatewayVpcAttachment | |
| ec2:AcceptTransitGatewayVpcAttachment | |
| ec2:DescribeTransitGatewayVpcAttachments | |
| ec2:DescribeVpcs | |
| ec2:DescribeSubnets | |
| ec2:CreateRoute | |
| ec2:DeleteRoute | |
| ec2:DescribeRouteTables | |
| ec2:DescribeNetworkInterfaces |
Create a Cloud Connect
Step 1: Go to the Cloud Connects page.
-
Log in to Console and select the Multi-Cloud Network Connect workspace.
-
Select Manage > Connectors > Cloud Connects.
Step 2: Create a Cloud Connect.
-
Select Add Cloud Connect.
-
Select a cloud provider from the Provider drop-down menu. The choices are AWS or Azure.
AWS TGW Site
-
Select a site reference from the Site Reference drop-down menu. After you've made a selection, you can select View Configuration to verify the configuration details.
-
Select a cloud credential from the Credential Reference drop-down menu. Or select Add to create a new one. After you've made a selection, you can select View Configuration or Edit Configuration to verify the configuration details or make changes.
-
Under Spoke VPCs, select Configure to attach spoke VPCs to the AWS TGW Site.
-
Select Add for each spoke VPC you want to attach and then:
-
Enter a VPC ID for the spoke VPC to attach.
-
From the Routing Choice drop-down menu, select how to route traffic toward the CE:
-
Manual: You manage routing.
-
Override Default Route: You select the route tables. Next, select the Override Default Route Choice. If you choose Selective Route Tables for AWS, then you must also add one or more Route table IDs.
-
Advertise Custom CIDRs: Specify the CIDR routes to install for this subnet. Select Add for each route table in your list. For each route table, select a Route table ID and then enter one or more Static Routes using Add. Select Apply twice.
-
-
Optionally, add labels.
-
Azure VNet Site
-
Select a site reference from the Site Reference drop-down menu. After you've made a selection, you can select View Configuration to verify the configuration details.
-
Select Add to create a VNet attachment and then:
-
Enter the Subscription ID of the VNet to attach.
-
Enter a VNET ID of the VNet to attach. Must be in the following format:
/<resource-group-name>/<vnet-name>. -
From the Routing Choice drop-down menu, select how to route traffic toward the CE:
-
Manual: You manage the routing.
-
Override Default Route: You select the route tables. Next, select the Override Default Route Choice. If you choose Selective Route Tables for Azure Site, then you must also add one or more Route table IDs.
-
Advertise Custom CIDRs: Specify the CIDR routes to install for this subnet. Select Add for each route table in your list. For each route table, select a Route table ID and then enter one or more Static Routes using Add. Select Apply twice.
-
-
Optionally, add labels.
-
Step 3: Select a segment and save.
-
Use the Segment drop-down menu to select an existing segment, or select Add to create a new one.
-
Select Add Cloud Connect to create the Cloud Connect.
Step 4: Verify your Cloud Connect.
-
Select Manage > Connectors > Cloud Connect. Select Refresh to see your new Cloud Connect in the table.
-
Select ... > Show Status for your new Cloud Connect and then select the UID object. The Status section shows the current state of your Cloud Connect. During creation, the State column displays Pending, and the Deployment Status displays Not Ready. After a few minutes, the values change to Available and Ready.
Delete a Cloud Connect
-
In Console, select the Multi-Cloud Network Connect workspace.
-
Select Manage > Connectors > Cloud Connects.
-
Select ... > Delete in the Actions column.
-
Select Delete in the confirmation pop-up window. The Status column for your Cloud Connect changes to Degraded during the deleting process. After it's deleted, the Cloud Connect is removed from the table.
References
For more information, see: